As a budget conscious hobbyist, I try to keep my budget manageable. One way I do this is to only use inexpensive craft paints. Brands like Anita's and Americana can be used for a very good result with only a few steps.
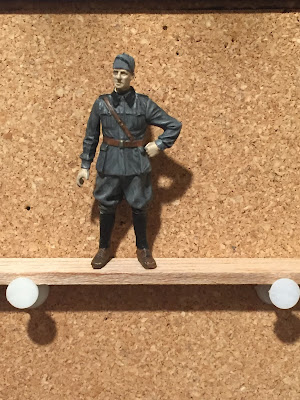
To demonstrate these techniques, I painted this Tamiya 1/35 Italian Officer. He is a crisply detailed figure and very easy to work with. After building the figure, I trimmed any excess glue.
Step 1
Instead of priming, I give the figure a base coat in either black, grey, or white. This base gives your other paints a better surface to hold to, but also serves some appearance purposes as well. The black adds a darker tone to whatever color you put on top. White does the oposite of this and grey is more of a neutral base. I chose matte black for this figure because of the grey colored uniform. Your base coat doesn't have to be perfect! I missed some spots on the lower legs of this model. What is important is that you only use one coat and let the molded details show through.
Step 2
Next I paint on what ever color the majority of the figure will be. Two thin coats does the trick nicely but make sure you give the model time to dry between coats. This gives you the most detail retention possible. Obviously the black shows up under the first coat but the second coat provides a nice overall color.Step 3
After the main color is dry, I move to the skin tone. After applying one thin coat you will start to doubt that this model could ever look good with these paints, but have faith!
Step 4
While the skin tone is drying, I move to the other colored details on the model. For this officer it was a Sam Browne belt and black leather leggings over his boots.
Step 5
After the first coat of skin tone is dry, I put another thin coat over it. while this dries I continue working on the other details of the model. Here I painted the piping on his cap, browned his boots and tidied up his collar.
Step 6
Here I finish up any little details left to be done. Hair, buttons and touching up any mistakes are what I did here.
Step 7
This can be the most challenging step, giving the figure a wash. After it dried, I gave this figure two colors of wash; a brown wash on all exposed skin and hair, and a black wash over everything else. Take a few milliliters of water and mix one or two drops of paint with it. Stir it till it has an even consistency. It should be very runny. Apply this mixture with a brush and absorb any large areas of excess by touching them with a paper towel.
Step 8
For protection I varnish my figures in an ultra matte varnish. Tabletop miniatures endure all kinds of abuse either in storage, transit or on the game table itself. The varnish will look very glossy at first. but as it dries will preserve the original look very well.
Here's my completed figure. The washes bring out the uniform and face details and show just how well sculpted this figure is. When I started the hobby, painting seemed so intimidating. Hopefully this little tutorial helps someone see how simple painting a nice table ready miniature can be.


An interesting tutorial, nice and easy to follow,so thanks for that.
ReplyDeleteThanks for the comment!
Delete